
To give a bit of back story (I’m really good at that) — I GROW. I’ve literally been growing this plant from the very first joint I ever smoked (which happened to contain a few seeds that I removed and planted) — and then I smoked the good stuff for the very first time.
One thing that growing Cannabis for my whole life has taught me, there is ALWAYS a better way, rearing its ugly head — ugly, because the money you’ve spent to trick-out your perfect grow space is now spent, and you get to do it ALL OVER again. Much like music, you’ll end up replacing ALL of your gear with all NEW gear, and get an incremental gain in yield/potency, and all is well — until the next NEW BREAKTHROUGH…Such is life — we learn, figure out new things, and new ideas and methods replace the old, outdated ways. I’ve grown outdoors in soil, indoors in soil, first, hand watering, then moving to drip systems, each step of the way becoming easier, and less time-consuming.
I moved to hydroponics in the early 90’s and grew that way for many years with great success — it was SO much lower maintenance, and allows much greater control over pH levels, water flow, flushing your plants, and the concept of “ebb-and-flow” was introduced, which actually draws more oxygen through the root mass, each time the flood table “ebbs”/drains, drying the roots a bit, which stimulates growth.
The word, “hydroponics” is a compound word from Latin, and it literally means “working water”.
Each new method that emerges gains a bit more of an advantage and is a bit more superior to the one preceding it, and this holds true with Deep Water Culture, as well- just a more sophisticated, yet simpler implementation of hydroponics.
This method can be executed in many different ways, but I’m going to outline the simplest, most inexpensive, do-it-yourself way of getting your grow thriving.
I did this to begin with out of necessity.
Since one of my many projects is working with a myriad of landrace and legacy strains, I needed a way to do a quick turn-around on strain production for breeding and research purposes.
This involves cataloging terpene and cannabinoid profiles, to ultimately “engineer” plants that will yield the best medicines, targeted at specific issues and illnesses.
This is comprised of, but not limited to, nurturing, growing, breeding, testing, reviewing/studying test results, tweaking strain-crossing schedules based on the test results, pollinating plants, harvesting seeds, taking cuttings and starting all over again, as quickly as possible.
The simple idea behind this method is based on the concept that the roots of the plant are always seeking water, oxygen and nutrients.
Somewhere along this journey, someone discovered that if you suspend a plant over aerated, nutrient-rich water, the roots of the plants would seek out the water and nutrient source. They essentially chase the water-level, so as the nutrients and water solution is absorbed and used, the roots reach down for the diminishing level of the liquid, forcing the plant to optimize its growing cycle, to where the plant literally explodes with growth.
There are all sorts of containers that can be used, but the simplest, easiest to move, and most inexpensive to use for this growing method is a 5-gallon paint/utility bucket that can be purchased very inexpensively at any hardware, construction or home improvement store.
This system consists of a bucket, a lid with either a single basket, or “net pot”, or a lid with holes to hold multiple net pots. Clay porous beads which retain moisture are used to anchor the roots of the plant and give it stability as it grows. There is an airstone connected via tubing to an aquarium air pump that aerates the water and nutrient solution.
That’s IT.
There are embellishments that you can add, such as a clear plastic tube outside the bucket to show the water-level, etc., but overall, this system is simple, self-contained and can be replicated to accommodate any size grow room or tent.This is a passive system, in that you fill the bucket with water and nutrients, put the airstone into the liquid, “plant” your cutting/teen in the basket and surround/fill it with the clay beads to support the plant, and stand back and watch your plant G R O W.
There is no additional watering, or maintenance of any kind, except to pluck fan leaves off as they die, and watch the plants grow.
You can either plant your vegging plants, one to each bucket, or use lids with multiple holes and plant 2-4 cuttings per bucket, and grow in short, quick-turnaround flowering cycles, compared to months of vegging to grow monster plants.
I always go for the 2 to 4 plants per bucket, as you can train the plants outward so they get plenty of light, but a single bucket can take small 6-8 inch cuttings and turn out full-grown, fully matured 2-3 foot plants within 1-2 months, depending on the strain, without any additional water or nutrients — but your mileage may vary.
Many folks doing this use what is called RDWC — the “R” standing for “re-circulating”. — using a separate reservoir to mix nutrients, and a pump that circulates water through the maze of buckets, etc.
Unless you are doing large, commercial growing, I think this is overkill for a small, 5-10 bucket system, and much too much work involved to maintain this type of system.
The key factor that I always strive for is what they call the K.I.S.S. system — “Keep It Simple, Stupid” — not saying any of us are stupid, but the simpler you can keep things, the easier it is to maintain, and most of us don’t have a staff of people to help us with all that a successful grow entails.
Ok, so let’s dive-in to making a Deep Water Culture bucket.
Most folks go with black buckets, to limit light leakage to the roots, as this can cause algae to grow in the nutrient-rich water, but I’ve used white buckets from my local hardware store with much success, and no algae growth at all.
You can also always wrap the buckets with black plastic if you encounter this issue, but I’ve never had any problems with using any color of bucket. Also, you now pay MORE for black buckets, because of this issue.
You’ll also need a standard “NPK” (Nitrogen, Phosphorus, Potassium) nutrient concentrate to blend your nutrient solution.
Generally, an NPK ratio of 3:1:1 during the growth phase is an excellent nutrient for virtually all cannabis strains, and the ratio I use is 16-6-4.You can buy premixed, prepackaged dry nutrients fairly inexpensively, and any brand that specifies that it’s a “Tomato” fertilizer — is perfect for the vegetative period.
Some strains will respond to some tweaking of this ratio, and I’ve noticed lately, the numbers going up and up in marketed nutrients, but you risk toxic levels if you push the envelope too far.
During the vegetative stage, it’s not all about nitrogen, but levels should always be proportionately higher than phosphorus and potassium until the flowering stage.
During the flowering stage, I blend a mix of the vegetative base nutrients I use, and my flowering ratio blend (1-34-32), meaning 1% nitrogen, 34% phosphorus, and 32% potassium.
Generally, the phosphorus levels stay the same, it’s the nitrogen and potassium levels that somewhat switch places, with the nitrogen levels dropping, and the potassium levels increasing.
You can buy any of these items at just about any hardware or home improvement store, or online, and if you really shop around you can get everything for a very small initial investment.
For this single-bucket system (this just means the buckets are not connected to one another)
Here is a basic list of items you need:
• An aquarium/hydroponic air pump for aerating the solution (I always buy the 4-port units, as then you can use splitters to run up to 8 buckets off of one pump)
• ¼”’13mm flexible aquarium tubing
• Airstones, for aerating the nutrient solution
• 5-gallon buckets (black, if available, and not too costly, but any color will work)
• Plastic lids
• Net pots
• Porous Clay Beads, or Coir (I just started using the coconut coir, and it’s pretty amazing, easy to work with, inexpensive and far more environmentally friendly than the beads).
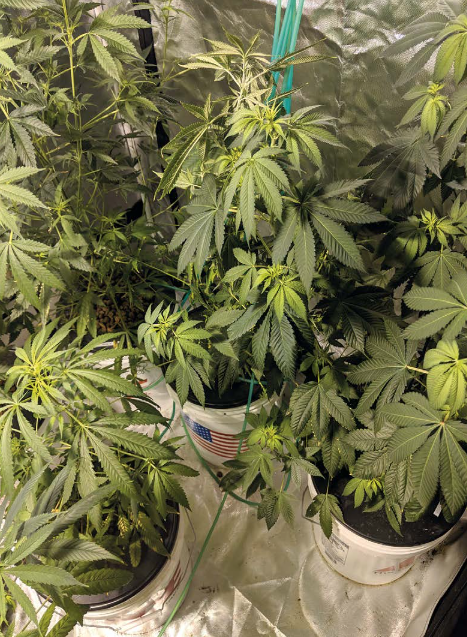
As I said above, I prefer using a single bucket to grow 2-4 plants each, as, that way, you can conserve on space, and train the plants to utilize as much growing space as possible, while minimizing the “footprint” to just the size of the bucket (see pictures).
Very simply, we assemble the bucket (the one in the picture has the fancy water level, and you can buy these in sets of 4 at your local home improvement stores)
In this case, just fill the bucket with either your vegetative or vegetative + flowering nutrients and water and mix well.
Make sure you have a hole (¼”/13mm) in your lid (you can do this with a drill or knife), and thread the air hose through the hole, then place the airstone on the end going in the bucket (push-fit).Then we place the top on, using either your single net pot, or a lid with holes for multiple net pots (you can purchase the lids separately on the internet, and cut them yourself, or they sell pre-cut lids, as well).
Connect the other end of the air-hose to your air pump (if you have a multi-port pump, you can run 4 buckets, or with splitters, as mentioned above, you can run 8).
Put your cuttings into the net pots first, then fill around them with either the beads, or as I say, the coco coir works really well, pushing it down around the cuttings cube to stabilize the cutting — this way — the roots will penetrate the bottom of the net pot to reach the water.
I fill the bucket to where the cuttings roots are just barely wet, with the bottom of the net pot touching the water.
Turn on your pump, and watch!
I think you’ll be amazed at how well this system works, as from here on out, all you need to do is keep an eye on them, check the nutrient levels each week, and top them off with a gallon of pre-mixed liquid nutrients if the water is low — this is easy — simply lift the entire top of the bucket with the plants, set it on an empty bucket, being careful of the developing root system, add your solution and replace the lid. Make sure your lights are on the correct schedule (I go 24-hours on for cuttings and moms, as they root very quickly, and trigger very quickly when the lights are cut to 12/12), and remove any dead leaves, etc.
Personally, I don’t strip leaves off the plant — I’ve always believed, even before I learned the mechanics of the plant, that they were the workhorses — the solar-collectors, if you will, of the plant to produce the flowers — oh, those beautiful BUDS!
I’m not going to cover lighting, as that’s a completely different can o’ worms, however, suffice to say, the best LED light you can afford is the one you should go with, and they’re becoming more and more affordable every day.

There, you HAVE IT!
This may seem WAY TOO over-simplified, and in some ways, it is.
But I’ve laid the groundwork, and the internet is RIFE with information on this, if you’re interested in learning more — but the seed is planted.
I just wanted to get you started on the simplest growing method I’ve encountered to date, especially for those of you who can’t afford the (sometimes) exorbitant prices for medications, and for those who are treating children who may likely have to be using this supplement for the rest of their lives.
Written and Published by Fred Delisio in Weed World Magazine Issue 141


